


Figure 1: Air conditioner outdoor unit.
The compressor is the main part of the air conditioner. Once it is broken or cannot be used, the air conditioner is equivalent to a waste, and can not cool. What should we do?
Compressor for AC unit (air conditioning compressor, air conditioner compressor, AC compressor,) includes central air conditioner compressor and small home air conditioner compressor. If they are broken, usually large AC compressors can be repaired, but small and medium compressors generally cannot be repaired, and replacement is the only way.
When it is determined that the air conditioning compressor is broken and must be replaced, first check the cause of the broken compressor, judge and analyze how it broke. Is it because that the life of the compressor for AC unit is over, the compressor is overloaded, the voltage is unstable, the system is too dirty, the motor is overheated, the system does not has enough refrigerant and is used for a long time? Figure out the reason before replacing the compressor, otherwise the same problem may occur after the replacement.
The detailed procedure for replacing a small air conditioner compressor is described below.
1. Home AC Compressor Replacement Specific Steps
Tools to prepare:
Hand tools (including adjustable wrench, phillips screwdriver, fixed wrench), welding gun, refrigerant recovery tank, nitrogen tank, new air conditioning compressor of the same model, pressure testing instrument, vacuum pump, refrigerant, electronic scale, etc.
After confirming that the air conditioner compressor has a problem and needs to be replaced, the specific steps are as follows:
1.1 Cut off the Power
Before replacing the compressor, be sure to cut off the power supply of the unit, otherwise there will be a risk of electric shock.

Figure 2: Cut off the power.
1.2 Release the Refrigerant
Open the high and low pressure side valves with the adjustable spanner, and the operating environment should be well ventilated.
The speed of releasing the refrigerant should not be too fast, so as not to cause the operating staff to be frostbitten by the refrigerant. If conditions permit, the refrigerant should be recovered instead of being discharged directly to protect the environment.

Figure 3: High and low pressure valves of the air conditioner outdoor unit.
1.3 Remove the Outer Casing of the AC Outdoor Unit and the Lead Wires of the Compressor
1. Use a Phillips screwdriver to remove the fixing screws on the top, right side, front side covers of the outdoor unit, and then remove the top, right side and front side covers in sequence.
2. At this time, you can see that there is insulation cotton around the outside of the compressor. Find the fixing line and remove the insulation cotton.
3. Use an 8mm wrench to loosen the fixing nuts of the compressor wiring cover, and then remove the nuts and the wiring cover in sequence.
4. Use a mobile phone to take pictures or record the lead wire connection situation of the terminal block with a pen, so that the lead wires can be connected correctly after installing the new compressor. Then use needle-nose pliers to remove the 3 leads from the terminal block, and remove the gasket of the top terminal box cover.

Figure 4: Disassembled air conditioner outdoor unit.
1.4 Remove the Suction and Discharge Pipes
Before removing the suction and discharge pipes, ensure that the refrigerant in the system has been exhausted. Use gas welding to heat the welding joint, and after the solder at the welding joint melts, pull out the suction and discharge pipes.
During the whole welding process, the system must be filled with nitrogen. The nitrogen pressure is 0.5±0.1kgf/cm², so as to avoid oxidation of the copper tube and also pay attention to whether there are impurities and foreign objects on the inner wall of the copper tube, and remove them in time.
When welding, pay attention to controlling the direction of the flame, and make it avoid sleeves, wires, etc.

Figure 5: The suction and discharge pipes of GREE AC compressor.
1.5 Remove the Old AC Compressor and Replace It
1. Use a wrench to remove the 3 fixing nuts of the compressor. Hold the AC compressor with both hands, lift it upwards, separate it from the base of the outdoor unit, and take out the compressor.
2. Recall the fixing method of the old compressor, and install the new AC compressor at the place of the old one and fix it.
3. Remove the plastic sealing plugs of the suction pipe and discharge pipe of the new compressor, and use a welding torch to weld the connecting pipes of the discharge pipe and suction pipe in sequence.
4. Connect the wires to the three terminals of the compressor.

Figure 6: The gasket of the top terminal box cover, and the 3 terminals.
Notice:
1. During the transportation of the compressor, the inclination angle of the compressor shall not exceed 45°.
2. Before welding, remove oil stains, oxides, burrs and other debris on the surface of the welding joints of the connecting pipe. Be sure that the system is filled with nitrogen for protection during the whole welding process.
3. When pulling out the rubber plugs of the compressor, pull out the discharge pipe’s plug first, and then the suction pipe’s plug. The interval between pulling out the rubber plugs and welding the piping should not exceed 10 minutes to prevent air, moisture and impurities from entering the system and affecting the performance of the unit.
4. In principle, the AC compressor replacement requires the use of the original model compressor of the same brand. If it cannot be satisfied, the capacity of the new AC compressor must be consistent with that of the old.
5. Scroll compressors are not interchangeable with rotary compressors; single-phase compressors are not interchangeable with three-phase compressors.

Figure 7: Install the new AC compressor.
1.6 Detect Leakage
After the suction and discharge pipes are welded, checking for leaks is needed. The gas used for leakage detection can only be inert gases such as nitrogen and carbon dioxide.
Connect the pressure detection instrument to the system and the compressed gas cylinder according to the safety requirements, and open each valve in the system.
·First increase the pressure of the system to 0.3MPa, then stop and observe for 5 minutes to check whether the pressure has dropped significantly;
·Then increase the pressure to 1.5MPa, stop and observe for 5 minutes to check whether the pressure has dropped significantly again;
·After that, raise the pressure to the specified pressure (about 2.6MPa for R22 system and about 3.8MPa for R410a system), and record the ambient temperature.
·After 24 hours, it is ideal if the pressure drop is within 0.02MPa (the temperature changes by 1°C, and the pressure changes by about 0.01MPa).

Figure 8: Pressure gauge.
If it is unideal, it means that there is a leak in the system. Be sure to perform the leakage detection for the system. After finding out the leakage point, re-weld and then repeat the above steps until it satisfies the need.
The following methods can also be used to check the system for leaks.
Apply the soap foam to the welding position of the compressor suction and discharge pipes to check whether there are bubbles to determine whether there are holes that cause refrigerant leakage. If there are no bubbles, it is normal. If there are bubbles, it means that there is a leak, and the pipes should be re-welded until there is no leak detected.
1.7 Evacuate the System
After completing the installation, and checking for leaks, before filling the refrigerant, the system must be evacuated to remove the air and moisture in the system.
It is strictly forbidden to use the method of blowing refrigerant into the pipeline to evacuate. This method is difficult to completely remove the air and moisture in the system, especially when the system pipes are long. In addition, it is strictly forbidden to run the AC compressor to evacuate the system, which may cause the compressor to burn out.
Pulling a vacuum with a vacuum pump is the only way to ensure that the system is purged of air and moisture.
When pulling a vacuum, it is necessary to select a suitable vacuum pump according to the length of the refrigerant pipeline. If the vacuum pump is too small, the pump down time will be too long, or the required vacuum degree can not be achieved.
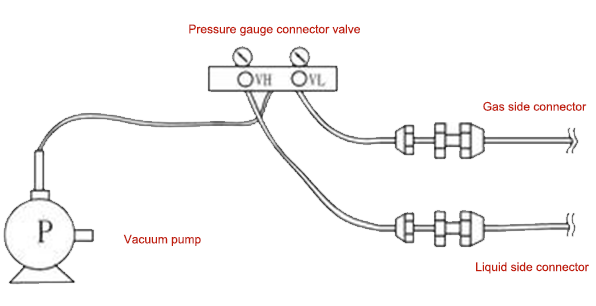
Figure 9: Compressor evacuation system diagram.
1. Before vacuuming, the gas used for leakage detection in the system should be discharged cleanly, and the gauge pressure should be reduced to 0MPa.
2. Connect the common joint of the pressure gauge to the suction port on the vacuum pump; connect the high and low pressure ports on the pressure gauge to the service valves on the high and low pressure sides of the system respectively. With the valves of the pressure gauge closed, open the service valves.
3. Start the vacuum pump and slowly open the pressure gauge pipe valve to start vacuuming. The suction pressure of the vacuum pump must be limited by means of a pressure gauge pipe valve to avoid the vacuum pump motor overloading.
4. After the vacuum degree reaches -0.1MPa (gauge pressure -1kgf/cm2), continue pumping for 0.5~1 hour, close the high and low pressure cut-off valves, and stop the vacuum pump.
5. After the evacuation is completed, wait for 6 hours to see if the vacuum level changes or not. If it does not change, charge the refrigerant. If the vacuum level changes, it means that there is a leak in the system. It is necessary to re-check the leak of the system and re-weld the leak point until it is qualified.
1.8 Refrigerant Charging
The amount of refrigerant charged to the unit should be calculated strictly according to the requirements on the nameplate and the length of the connecting pipeline between the internal and external units. When filling, it is necessary to use an electronic scale to accurately measure the amount of refrigerant filling.

Figure 10: Refrigerant charging system diagram.
1.9 Trial Run
1.Reinstall the electrical components such as the electric heating belt and the sensing bulb of the AC compressor to their original positions, install the insulation cotton outside the compressor, install the right side cover, front side cover, and upper top cover in sequence, and tighten all the fixing screws.
2.Restore power, make sure the unit is well grounded, and start the AC compressor intermittently to see if it reverses.
3.Turn on the AC compressor for trial operation, and listen to whether there is any abnormal sound from the compressor and the fan, whether the various modes of the air conditioner are operating normally, and whether the current of the unit is within a reasonable range. After everything is normal, the replacement and maintenance of the unit is completed.
The replacement and maintenance of other air-conditioning components (such as four-way valves, electronic expansion valves, etc.) should also be carried out in strict accordance with the installation and operation specifications.

Figure 11: Turn on the air conditioner.
2. Can I Replace My AC Compressor Myself?
Best not to replace it yourself. The AC compressor replacement is a big project, which requires professional knowledge and tools. If you don't have the corresponding ability to replace it yourself, it's best not to replace it yourself. It is recommended to contact the after-sales staff or service maintenance personnel for a repair and replacement.
The AC compressor replacement cost is relatively expensive, and the prices of different brands of compressors are quite different, so just choose the appropriate compressor according to the actual needs. Generally, a new AC compressor price (AC compressor cost) is $200-$3,000, plus replacement costs, the final cost is about $400-$4,000.
Related Info
4 Ways to Test AC CompressorWhat is Refrigeration Cycle? The Refrigeration Cycle Explained
What is a scroll compressor? Everything You Need to Know
Thermal Expansion Valve (TXV): Everything You Need To Know
Air Conditioner Compressor: How It Works, Functions, Troubleshooting&Maintenance
