


Figure 1: How to install a sump pump check valve.
1. Check Valve Basics
What is a sump pump Check Valve? It is a device that keeps water from reentering the discharge pipe whenever the pump is not running. It keeps your system from repumping the same water over and over again. Installing a sump pump check valve is a straightforward process, but you need to know what you are doing. Incorrect installation could cause your pump to fail and result in damage to the system. The steps below guide you through the replacement process so that you can have peace of mind that your sump pump is functioning as it should.
When a sump pump check valve is not working, water flows back from the discharge piping into the sump pump pit. This means your system ends up pumping the same water again and again. So, a check valve can cut down on electrical costs and prolong the life of your motor.
If your sump pump is often running, it could be a sign that your check valve needs replacing. Also, if you think your valve is leaking, you can pour some water into the pit and wait for it to kick on. Check for moisture around the valve, but also inspect other pipes for leaks as well.
2. Installation Steps
If possible, drain any water from the sump pump pit. Then be sure to disable electricity to the system. If you are unplugging the device, be sure to keep the cord away from any standing water.
2.1 Gather the Correct Parts
You will first need to know what parts to buy, including the correct size sump pump check valve to correspond with the diameter of the pipe. PVC pipe often has its dimensions printed on it. If it does not, measure the end of the discharge pipe and buy the appropriate replacement check valve. Most are either 1 1/4 to 1 1/2 inches.
You will need PVC couplings and nuts that can adapt an ill-fitting sump pump check valve into your drainage pipe. Also, you will need PVC cement, sandpaper, and a hacksaw or pipe cutter.

Figure 2: Purchase the PVC fittings you need for the installation.
2.2 Determine Positioning
If you are not replacing but installing a new check valve, be sure you have the right pipe leading from the sump pump outside your home. The closer you can position the check valve to the pump, the better. This limits the amount of water that can accumulate between the pit and the valve. To determine how much pipe to remove, measure the distance from one coupling to the other. If you purchased a valve with hose clamps, measure from between each set.

Figure 3: Buy a new valve that is the same diameter as the drainage pipe.
2.3 Cut the Pipe
Use a pipe cutter or hacksaw to sever the piping where you would like the check valve to go. If you are uncertain of the amount that you should remove, start small, then cut extra segments, if necessary. If you are replacing an old valve with metal clamps, loosen them and remove the device. If the valve has been cemented in, try heating the adhesive with a hairdryer, then loosen the valve with plyers.

Figure 4: Cut the pipe if you’re installing a new valve.
2.4 Install the Replacement Valve
Test to see if the check valve fits lengthwise. Then sand down the ends of each section of the pipe until they are smooth. Place the PVC nuts then the couplers onto each rim of the pipe ends. If the check valve came with rubber o-rings, slide those into place as well. Then position the check valve and tighten the hose clamps. Finally, turn the couplers clockwise to tighten the connections.
Once you are certain that everything fits snugly, remove the valve. Apply PVC cement to the surface area of the couplings where the valve connects and reassemble the configuration. Allow the adhesive to dry for several hours before running the sump pump.
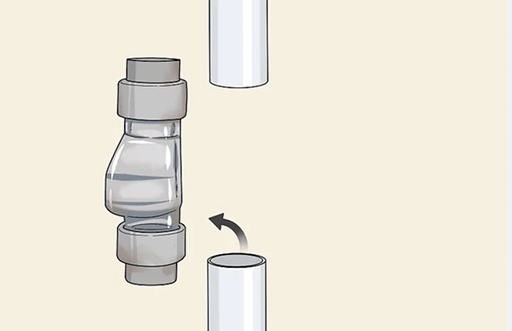
Figure 5: Remove the old valve if you’re replacing one.
2.5 Test the Check Valve
Turn the pump back on and test it to see if it operates. Again, pour water into the pit and wait for it to kick on. You may hear the check valve internal flap as the water surges and then stops.
Once the pump drains the water, look to see if any reverses into the pit. If there are none and no leaks throughout, then your sump pump check valve installation was a success.

Figure 6: Test your sump pump check valve.
Related Info
What is Check Valve?Types of Check Valve
Introduction to Priming in Pumps
What is Piston Pump?
