


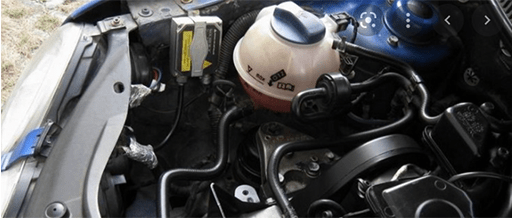
Figure 1: Solenoid valve is in engine compartment. (Go to Okmarts and pick the solenoid valve you need.).
① Before removing the valve body from the bottom of the transmission, take extra care when removing the flat wire of the external solenoid valve. Since the solenoid valve connector on the side of the flat line is a plastic product which has been immersed in ATF oil for a long time and it is very brittle at high temperature, it should be fully inserted into the lower side of the solenoid valve plug with a self-made special tool. Pull out the plug and harness in this direction. Place them properly. Remove the parts that are easy to fall off on the surface. Remember the original position. Soak the valve body in kerosene for a long time and then take out the empty part.

Figure 2: Remove the valve body from the bottom of the transmission.
② Place the valve body on a clean workbench and remove the connecting screws between the upper and lower valve bodies. Hold the upper part of the valve body and the diaphragm in the middle firmly and turn over together to make the middle diaphragm upward (this can prevent the one-way steel ball from falling). And then pick up the diaphragm for the next operation. After removing the diaphragm, before removing the plunger of the control valve body, please use the residual oil on the oil circuit diaphragm and copy the oil circuit diaphragm drawing with a slightly thick white cardboard. Mark all parts in the oil circuit diaphragm one by one on the drawing for future reference during reassembly.
③ Put the valve body into clean kerosene and clean it with carburetor cleaning agent. Use a small brush to clean the oil dirt deposited in the oil passage. If necessary, wipe it with nylon cloth. Visually check that there is no crack and deformation on the valve body. Each plunger should operate flexibly when pulled out with a small screwdriver, and the piston surface should be free of cracks. Place the empty and dry valve body flat on the table, inject a little automatic transmission oil into each oil hole and oil passage, and remove all small parts from the diaphragm at the same time. Take one piece by one piece and clean them in time. Then please dry it and put it into the valve body. At the same time, check that all parts are complete and in good condition.

Figure 3: Clean the small parts.
④ Check whether the plunger is stuck. In the control valve body except that the plunger of the manual control valve has no limit device that can be taken out directly. The outer ends of all other plungers have limit devices. There are three kinds of limit devices: cylinder, card and bayonet pin. The cylindrical limit device only needs to be gently pushed, and the limit pin will fall off. The card or cotter pin needs to be disassembled with tools. During the disassembly process, the plunger needs to be butted with fingers or screwdriver to prevent the plunger from popping out under the action of the inner spring at the moment of the removal of the limit device.
If the plunger is stuck in the valve hole and cannot fall out freely, it can be taken out by gently knocking the valve body with a wooden hammer or rubber hammer. The stuck plunger can be polished along the arc direction with sandpaper stained with ATF oil. Only the plunger should be polished. And it can be polished with toothpaste. The valve hole cannot be polished and polished to the standing valve body. On the premise of being clean, the plunger can slide slowly to the other side only by its own weight. In the process of disassembling the plunger, it is best to overhaul one group and disassemble the other group after reassembly. So they can avoid the wrong position between each other.
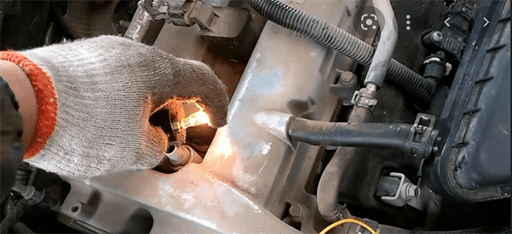
Figure 4: Check whether the plunger is stuck.
⑤ Replace the sealing ring on the body of control valve. And whether the working oil circuit of the force application device is sealed mainly depends on the following aspects: 1 The sealing ring on the working piston of the force application device; 2. Piston sealing ring on accumulator; 3. Sealing ring on control valve; 4. The sealing condition of the sealing rings on both sides of the oil inlet of the clutch support.
During the overhaul, the sealing rings in these four aspects must be completely replaced. Whether the accumulator piston has cracks and whether the piston ring is worn must be carefully checked. Otherwise, the automatic transmission is easy to burn the friction plate after the overhaul. And the force application device will be ablated again after driving about 3000km which is directly related to the above four aspects.
⑥ Clean and dry the diaphragm, please check that the diaphragm should not have large deformation. And carefully observe that whether there is light leakage at each oil hole. Note that the old and new sealing gaskets and diaphragms of the valve body must be close together. Check whether all the holes and oil direction on the paper gasket are consistent with those on the valve body (this is very important). At the same time, soak the sealing gasket to be installed with ATF oil for a few minutes, and then according to the steps of disassembly, please place the valve body horizontally and push the parts one by one, rather than erect the valve body vertically. Then buckle the upper and lower valve bodies and the middle diaphragm together and tighten the connecting screws evenly and crosswise.
So far, the valve body has been assembled. In general, the automatic transmission lubricating oil (ATF) needs to be replaced every two years. The automatic transmission needs to be cleaned and maintained every 40000 kilometers.
Related Info
How do the components of surge protector workDifferences between ac contactor and dc contactor
How to deal with 6 common faults of contactor
