


Figure 1: HP notebook.
Recently, the HP notebook for personal use prompts that the fan
is broken when it is turned on. I decisively placed an order online and bought a replacement fan. Today I will share
with you the process of disassembling the notebook and installing the fan.
Open the express package, which is like this. There is a fan, a small brush, a CPU thermal grease syringe, a
screwdriver and a plastic card for disassembling the computer cover.

Figure 2: HP replacement fan and give items.
The gift items are relatively complete, and basically there is no need to prepare other things additionally. I have to mention here that the merchant is really considerate, thank you very much.
1. Step by Step Showing You How to Replace a HP Laptop Cooling Fan
1. First, turn off the laptop and disconnect all connections, including chargers and external devices. Be sure to
wait for the computer to cool down completely before starting the replacement process.
2. Turn the notebook over so that it is convenient to disassemble the bottom cover.
3. Open the bottom cover of the computer. Here you need to remove the screws of the bottom cover first. Be careful
not to use too much force when removing them.
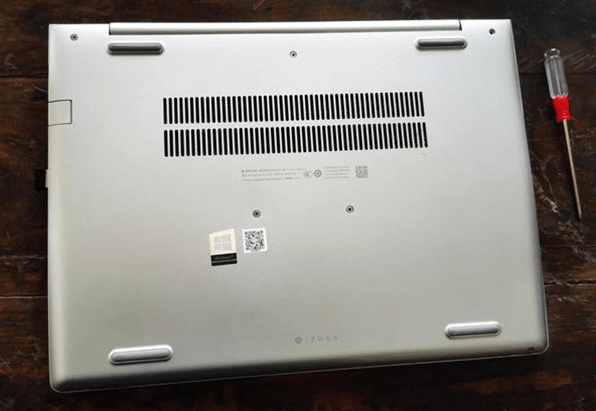
Figure 3: The bottom of the HP laptop.
As shown in the picture, there are 7 fixing screws on the bottom cover (upper, middle and lower) of this computer, and unscrew all the screws.

Figure 4: 7 screws on a desk.
4. Then carefully pry off the bottom cover of the computer with the plastic card.

Figure 5: Use a plastic card to open the bottom cover of HP laptop.
Thus you can open the bottom cover of the notebook easily and safely.

Figure 6: View of HP laptop bottom parts.
After opening it, you will find that the fan you want to replace is quietly waiting for you.

Figure 7: HP laptop cooling fan.
5. Remove the screws on the fan.

Figure 8: 3 screws.
Just these three little screws.
6. Then unplug the fan power supply. Be sure to pull it out carefully.
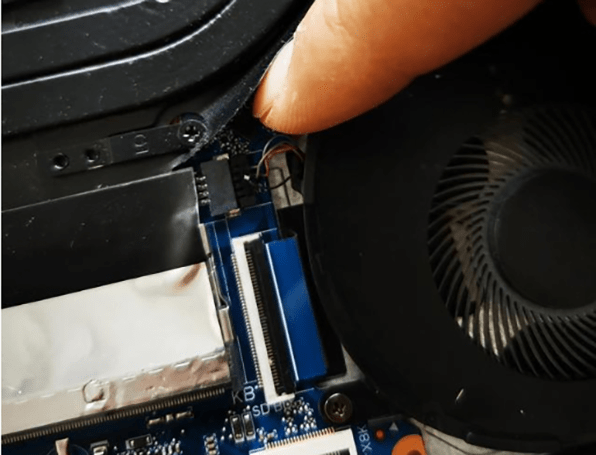
Figure 9: Cooling fan connector.
7. The fan can then be carefully removed.

Figure 10: The new cooling fan.
8. Put the new fan back on, fix it with screws and connect it to the power supply.
9. Then turn on the computer and start the test. If the fan runs perfectly, it means that the fan replacement has
been successful, and it is OK to reinstall the computer.
10. Reassemble the laptop. Make sure every part and screw is seated correctly and nothing is loose. Connect the
laptop to the power supply and turn it on to see if it works.
2. Notes on Laptop Cooling Fan Replacement
When you replace the laptop CPU fan by yourself, note that depending on considerations such as body thickness and cost, different brands of notebook cooling components are designed in different ways. Some have reserved a small cover for easy maintenance on the bottom case of the body, while others have to remove the entire bottom case.

Figure 11: A small cover on the bottom of a laptop.
In fact, the same is true for the internal heat dissipation components. Although the notebook heat dissipation components are composed of cooling fans and cooling fins, there are differences in the fixing methods of the two parts. For example, some are separately fixed, and some are integrated designs... These make the disassembly method of the cooling fan also different.
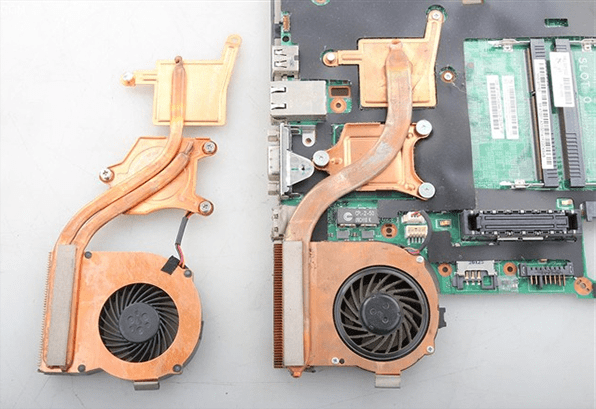
Figure 12: Notebook integrated cooling fans.
How to remove the notebook cooling fan? It depends on how the fan is fixed. The fan disassembled above is fixed by separating the cooling fan and cooling fins, which is convenient for disassembly, replacement and cleaning.
